


1965 Olivetti Praxis 48 #5038831
Status: Sightings
Hunter: Len Laughridge (Praxist)
Created: 08-05-2025 at 06:33AM
Last Edit: 08-05-2025 at 06:36AM

Description:
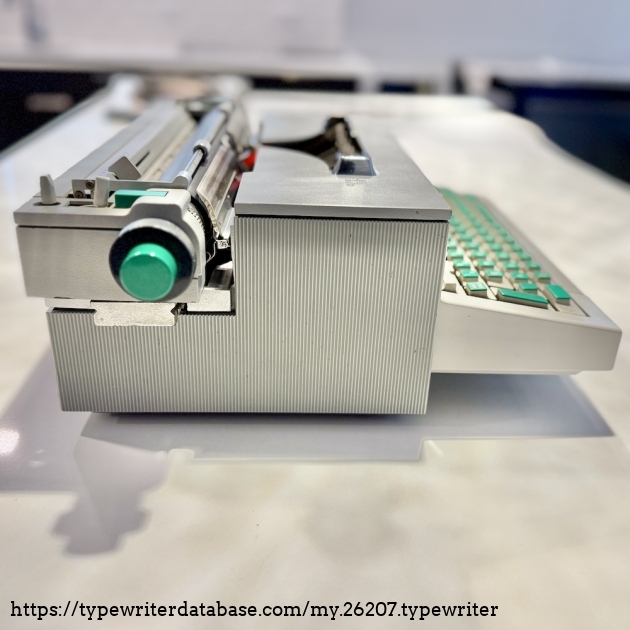
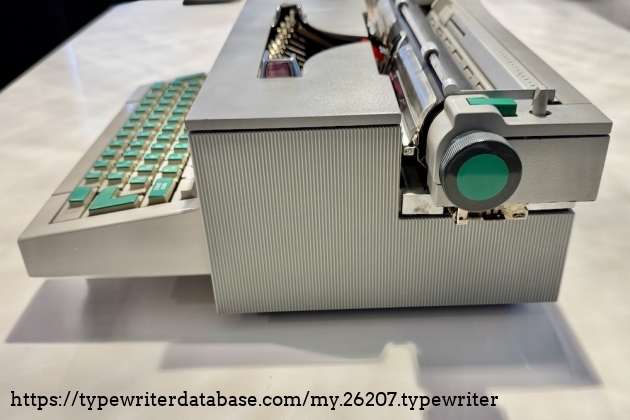
This is a very early production 1965 build, judging by the serial number. It has the early-style rectangular power cord connector. I restored it and gave it away.
When I acquired it, the typewriter was completely inoperable and jammed. The original metal access panel on the underside was missing and the springs were badly messed up as a result. It now functions, but due to 60 years of wear it is not completely back to new condition.
Servicing that was done:
✓ Disassembly/cleaning of case and thorough cleaning/degreasing of mechanism.
✓ Plastic case cleaned and new sound-deadening material added to replace perished foam.
✓ The original metal access panel on the underside is missing. I have made a plastic replacement to protect the springs.
✓ Carriage was removed, rails cleaned, and carriage-advance spring/‘draw band’ adjusted per Service Manual page 68. On reassembly, the two roller-bearing devices (Service Manual page 66 and 67, item ‘c’) were cleaned, lubricated, and inserted into the rails with the correct L/R positioning each. The carriage guide rail was adjusted per the Service Manual page 66 to eliminate play.
✓ A new attachment was fabricated to connect the carriage-return draw band to the left end of the carriage.
✓ The platen was adjusted and has good type-on-feet (Service Manual page 108). (see note below about shift alignment)
✓ The two drive belts are both brand-new. For reference, they are a standard type 70XL025 (35 teeth) available from www.grainger.com
✓ The ribbon is brand-new (‘BSIE’ brand).
✓ Two missing screws that hold on the keyboard case underneath were replaced with two new M3 screws. If the case ever has to be opened for servicing, do not completely remove these screws, just loosen them a few turns. They each tighten a clip that clamps the keyboard case to the main case, and it’s a pain to get them in the right place if you take those 2 screws all the way out and they fall apart.
✓ The two hex-head screws that attach the lid brackets to the main case and the keyboard case were missing and have been replaced with two new M3 screws with spacers to mimic the original style.
✓ The screw holding on the bracket for the right-side clear-plastic paper guide has been replaced with a new M3 screw (takes a 2.5mm hex tool).
✓ Left ribbon spindle (‘ratchet wheel’) retaining C-clip replaced.
✓ The carriage-return air cylinder (pneumatic shock absorber) was removed, cleaned, and reinstalled with gasket sealant between the device and the chassis (see Service Manual page 324 & 325). I do not recommend removing this device again during any service.
QUIRKS (and other weirdness):
There is a feature of the Praxis 48 that if you hit two keys at the same time, it will lock the keyboard instead of mis-typing. (see Service Manual page 192) To unlock it, hit backspace and then carry on typing. On THIS exact one, since it is very worn, this can be triggered even if you haven’t hit two keys at the same time. This one can’t handle typing as fast as a Praxis 48 usually should (designed for 840 characters per minute, per Service Manual page 44), so slow, deliberate typing is going to be more successful. However, this relates to the next major quirk which is…
Backspace sometimes triggers a carriage-return. According to page 26 of the Service Manual, backspace and carriage return are both powered by the Service Cam Group. Due to wear and possibly friction in this part of the mechanism, the following things are happening:
• The carriage-return keys (left and right) may not fully pop up to their normal resting position.
• Sometimes pressing backspace will trigger a carriage-return (and line-feed).
• Sometimes pressing backspace will trigger a line-feed.
Perhaps someone more skilled or motivated could fully disassemble and adjust the Service Cam Group, but that person is not me.
The mechanism in the left end of the carriage that advances the platen for line-feed is worn and I was unwilling to risk further disassembly to attempt adjustment (see Service Manual page 301 and 303, part labeled ’163’). The result is that if you select triple-space line spacing, it will almost certainly jam. Single-space, 1.5, and double-space seem to work more reliably.
Normal bell/end of line behaviour: The bell should sound 7 characters before the right margin so you can either finish the word or hyphenate before pressing ‘return’. If you hit the margin it will refuse to type any more characters.
Actual bell/end-of-line behaviour: The bell is very ‘dead’ sounding and may only make a faint metallic ‘tink’ instead of the bright clear sound the Praxis 48 usually does. I’ve tried adjusting, that’s just the way this one is. Also, at the right margin the carriage may not hit the right margin firmly enough to stop typing, leading to ‘piled up’ characters. This is not normal, but all the adjustments to the carriage return and shock absorbing ‘brake’ are the best I can get them on this particular machine.
I normally have the margins set for 3/4-inch left and right for US Letter-size paper. This gives 70 characters per line, 35 each side of centre. However, since the quirky behaviour of the carriage occurs more at the far left and right positions of the carriage, using at least 1-inch margins to keep farther away from the extremes of carriage travel may give better results.
Shift alignment - meaning that the baseline of printed upper-case letters matches the baseline of printed lower-case letters - is slightly off. Upper case is printing with a very slightly higher baseline than lower-case. Servicing for this is discussed in the ‘Segment Shift’ section of the service manual which starts on page 80. In restoring this machine, I decided that attempting to adjust for this minor misalignment was not in the scope of what I would do.
The clear plastic paper guides in front of the platen are interfering with paper loading. Carefully move them towards you when rolling paper into the platen to avoid snagging the top edge of the paper on some rivets behind those guides. They have been adjusted so the top of the TTTTT markings is the normal baseline of the printed type for easy paper re-alignment (see owners manual for more info).
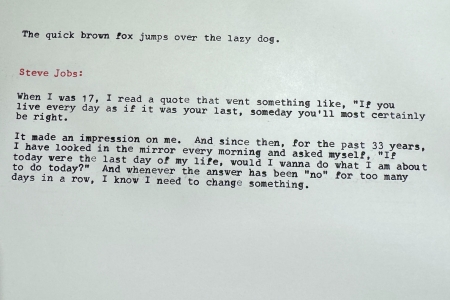
Typeface Specimen:
Photos:

Hunter: Len Laughridge (Praxist)
Len Laughridge's Typewriter Galleries [ My Collection ] [ My Sightings ]

Status: Typewriter Hunter
Points: 17
Fan of the Praxis 48.
RESEARCH NOTE: When researching the Olivetti Praxis 48 on a computer with lots of screen real estate, you may find that launching the Olivetti Serial Number page and the Olivetti Praxis 48 By Model/Year/Serial page in new browser windows can give you interesting perspectives on changes throughout the model series.